Introduction
Following the birth of a child and after the celebration is all the stuff you have to buy to protect the house of “potential dangers”. Quickly, you realize that you need to buy a baby gate.
I looked at several models and I have not found a model that can suit my needs and my situation. I needed a baby gate that can:
- Cover a length of at least 52 inches.
- Operate at an angle of 41.9 degrees.
- Attachable to a wall and a stair railing.
- Non-intrusive (it should not leave any mark on the ramp once removed).
- Strong enough to withstand a child jumping on it.
Unfortunately, the area to be protected is very large and I have not managed to find a gate that is long enough and solid to block the access to the stairs. This is how I started this project: build my own baby gate.
Project data
Equipment
The material for this project is as follows:
- 5 strips 2x2x8′ for the posts.
- 2 strips of 1×5½x8′ for up and down rows.
- 1 strips of 2x4x40″ for attachment to the boom.
- Dyeing
- Hinges
- Latch
Total cost of the project
The total cost of the project is about 80$ which is quite high for this type of project. The total cost includes a lot of wasted wood.
Preparation time
The whole thing took about 10-15 hours to complete (I do not have the exact time) not counting the drying time for dyeing. This includes the time to buy wood and all stages of construction.
Building steps
Construction steps are very simple. Just cut and assemble.
Cutting and Sanding
The easiest to begin with is to start with the posts. A total of 11 posts are needed. One of them will be use to attach the gate to the wall and a second one that ends flush with the gate to lock with the ramp. You need to cut 11 bars of 2×2 each one with a length of 35¾ inches.
The first post of the gate is special. It should be cut in an angle of 45 degrees but too much to make a triangle, but rather to 5 sides figure. Both pieces must of the same length: the 45 degrees one and the wall mount. The purpose is to facilitate the attachment step in the wall assembly. The following picture explains it better:

Then cut two sleeve each one of a total length of 50 inches for the top and bottom of the gate.
Cut a 2×4 board with a length of 33½ inches for attachment to the boom. This piece is used to avoid damaging the ramp to fix the latch on the gate. A cut of about 1 inch wide (the width of the stair railing) must be done in order to board the jam by a slight pressure. A 45 degrees notch is also made to property accommodate the gate when it is closed. The picture explains in detail the reasoning:


Sand all parts before assembly.
Assembly
There is nothing special to say to assemble the posts. Each one is screwed to the top and bottom rails. Each one is spaced by 4 inches which is a regular space for a stair railing.
Fixing the ramp
The innovation of this baby gate is related to the means used for fixing to the rail. This solution is not intrusive and does not leave a mark on the ramp when the barrier will no longer be necessary. No attachments or adhesive is required and the whole is as strong as the ramp.
The ramp is composed of two vertical bars on each side of the horizontal rail.

The 2×4 board piece is fixed by pressure to avoid leaving a trace on the stair ramp once removed.
Since the ramp is composed of two bars, I decided to screw a piece of wood in the bottom of the board that will fit between the bars to ensure that the board remains vertical and its place in the opening and closing of the barrier.

Dying
Once assembly is complete, you only have to dye the wood to the right color.
 When you apply a dye, you must be careful not to judge the appearance of the dye when it is dry. A dye like the photos has a brown-purple appearance when applied on wood and wet.
Installation
Wall mounting
For mounting on the wall, I used one of the bars that will be screwed into the wall through the plaster using two plaster screws. I have installed two hinges on the bar to be attached to the first rung of the fence (the one with a cut at 45 degrees).
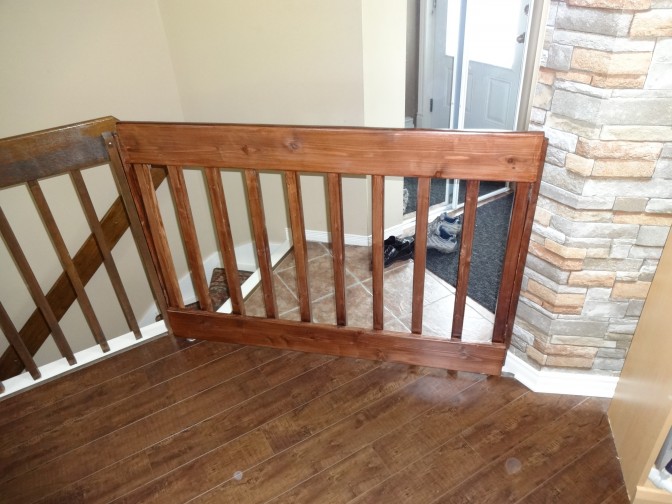
Final Result
Here is the final result:


Made anything differently?
Take your time and do not skip step
I was not convinced of the feasibility of the barrier when I started this project and so I did not do things in the right order. I was also too hurry to see the final product so I didn’t dye the wood before assembling it.
 It would have been normal to dye the wood before assembly to avoid areas that are not accessible or impossible to dye.
Dying the wood each piece at a time would have been more uniform and would have avoided drops everywhere. However, these details are not visible to more than 3 meters from the barrier.
Search for a finished product
I should have used a better wood quality. I have not taken the time to find the right wood to work with. I used the cheapest wood I could find at Home Depot but also wood for outdoor use instead of one with a more finished appearance for indoor use.
Notes
none